
Converting a Router to an Access Point.
Converting a Router to an Access Point (AP) to Strengthen Wi-Fi
Learn how to convert an old router into an Access Point (AP) with professional steps. A comprehensive guide on expanding Wi-Fi range, DHCP settings, and changing router IP to strengthen the signal.
Converting a Router to an Access Point: The Comprehensive Technical Guide
Contents of the Guide:
Do you suffer from a weak Wi-Fi signal in upper floors or distant rooms? Instead of buying a costly range extender, you can recycle your old router and convert it into a professional **Access Point** to cover all corners of your home with lightning speed.
Why Convert Your Old Router into an Access Point?
Converting a router isn’t just about saving money; it is a technical solution that outperforms wireless Repeaters in several ways:
- Speed Stability: Connection via cable ensures the full speed arrives without degradation caused by wall obstructions.
- Port Multiplicity: You get additional LAN ports in the new room to connect TVs or gaming consoles.
- Connection Capacity: A router’s processing power is often stronger than cheap extenders.
Requirements Before You Begin
- The Old Router: The device you want to convert into a signal booster.
- Ethernet Cable: Sufficient length to connect the main router to the old one.
- Computer or Laptop: For configuration (connecting via cable during programming is preferred).
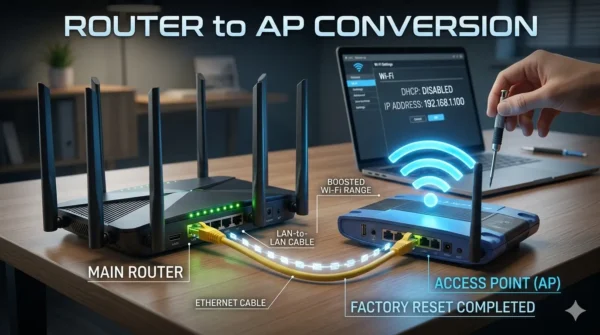
- Factory Reset: Perform a factory reset on the old router to start with clean settings.
Technical Steps (Software Configuration)
To ensure both devices work together without network conflict, follow these three golden technical steps:
1. Changing the IP Address
The old router must have an IP address different from the main router, but within the same range (subnet). If the main router is 192.168.1.1, make the old one 192.168.1.100, for example.
2. Disabling DHCP Server (The Most Crucial Step)
The DHCP function is to distribute IP addresses to devices. In your network, only the main router should perform this task. Enter the LAN settings, find **DHCP Server**, and select **Disable**.
3. Adjusting Wireless Settings (Wi-Fi)
You can make the Network Name (SSID) and Password identical to the main router for seamless “Roaming,” or make them different to distinguish between networks.
Physical Connection Method (Cabling)
After finishing the software configuration, comes the connection phase. There are two main methods:
| Connection Type | Port on Main Router | Port on Old Router (AP) | Result |
|---|---|---|---|
| LAN to LAN | LAN Port | LAN Port | Works as one single device in the network (Best and most stable method) |
| LAN to WAN | LAN Port | WAN Port (Internet) | Creates a separate subnet (Used for security isolation) |
Solutions to Common Problems
Why is the Internet not working after connection?
- Ensure DHCP is disabled on the old router.
- Make sure the IP address you chose for the old router is outside the distribution range (DHCP pool) of the main router to avoid an “IP Conflict”.
- Try restarting both devices (the main and the old router) after connecting the cable.
This guide was prepared based on the best global technical practices for 2026 to ensure the best home Wi-Fi coverage.